Raised Paver Patio Against House
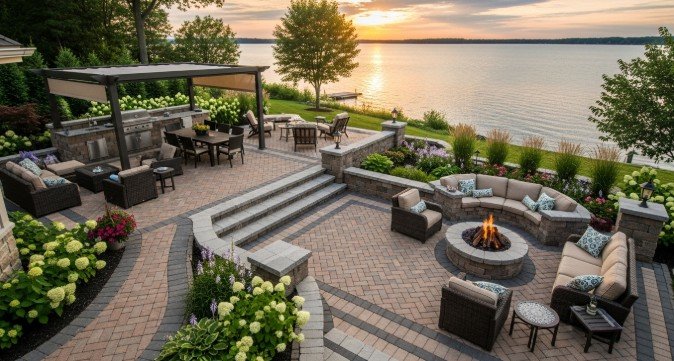
Creating an outdoor living space that is both functional and visually appealing can dramatically enhance your home. A raised paver patio against the house offers a solution that not only improves drainage and accessibility but also adds a polished, permanent feature to your property. Whether your yard has uneven terrain, water pooling issues, or you simply want to elevate your outdoor entertaining area, a raised patio provides a durable, versatile, and beautiful option.
This comprehensive guide will walk you through everything you need to know, from the basics of what a raised paver patio is, to materials, installation steps, and maintenance. By the end, you’ll have all the knowledge to plan, design, and build a patio that transforms your home’s exterior.
Short Answer: What Is a Raised Paver Patio Against a House?
A raised paver patio against a house is essentially an elevated patio surface built immediately adjacent to your home, constructed using pavers. Unlike ground-level patios, a raised patio offers structural height that helps manage drainage, allows for level transitions from doors, and can correct uneven yard terrain.
Key benefits include:
Better drainage: By elevating the patio, water is directed away from your home’s foundation, reducing the risk of flooding or water damage.
Aesthetic appeal: Pavers provide a clean, finished look, creating a seamless transition between indoor and outdoor spaces.
Corrects uneven ground: A raised patio built with expert patio paver installation techniques allows for level surfaces even on sloped or uneven yards, providing a stable and safe outdoor area.
Common materials and styles: Concrete, brick, natural stone, or porcelain pavers are popular choices. Styles can range from sleek modern designs to classic patterned layouts, ensuring your patio complements your home.
Why Build a Raised Paver Patio Against a House?
Core Benefits
Prevent water pooling and foundation damage
By building your patio slightly elevated and sloped away from the house, water naturally drains away from the foundation, protecting your home from costly water damage.Create an accessible outdoor living space
Raised patios create a clean, stable surface ideal for entertaining, dining, or relaxing outdoors. You can integrate seating, planters, or outdoor kitchens seamlessly.Enhance curb appeal and property value
A professionally designed raised patio can increase your home’s market appeal. Buyers appreciate durable, low-maintenance outdoor features.Provide easier transitions for doors and walkways
Especially on older homes with uneven yard levels, a raised patio can align perfectly with doors, reducing trip hazards and improving accessibility.
Considerations Before Installation
Before starting, consider these critical factors:
Soil type and slope: Sandy soils drain well, while clay may need extra base preparation. Sloped yards require careful grading to ensure proper water runoff.
Height requirements: Ensure the patio height aligns with your doors and allows safe step or ramp placement.
Local building codes and permits: Some areas require permits for elevated structures, especially those over 12 inches high.
Budget: Include costs for materials, labor, drainage solutions, and edge restraints. A well-prepared base is critical for longevity and stability.
Types of Raised Paver Patios Against a House
Material Options
Choosing the right paver material affects durability, appearance, and maintenance:
Concrete pavers: Durable and cost-effective, available in various shapes and colors.
Natural stone (flagstone, slate): Offers a high-end, organic look; excellent for landscaping integration.
Brick pavers: Classic appearance, ideal for traditional homes.
Porcelain pavers: Resistant to staining and fading; modern aesthetics.
Composite or modular tiles: Lightweight, easy to install, suitable for DIY projects.
Base and Structural Options
A strong base is critical for a raised patio’s stability:
Gravel and sand base: Common for most DIY patios; allows drainage and flexibility.
Concrete slab base: Provides maximum stability for heavier pavers or furniture.
Reinforced edge restraints: Prevent shifting and maintain alignment over time.
Drainage layers and waterproofing: Protect the house and patio from water infiltration.
Style Variations
Raised patios can be designed to match any home style:
Modern sleek design: Clean lines and uniform paver patterns.
Rustic natural look: Irregular natural stone layouts.
Patterned layouts: Herringbone, basket weave, or diagonal designs for visual interest.
Multi-level patios: Create tiers for dining, lounging, and gardening areas.
Guide to Installing a Raised Paver Patio Against a House
Step 1: Planning and Measuring
Measure the patio area, noting doors, walkways, and corners.
Decide on the patio height, ensuring it aligns with thresholds.
Choose paver style, pattern, and size.
Confirm drainage slope: 1/4″ per foot away from the house is standard.
Step 2: Excavation and Ground Preparation
Remove topsoil to accommodate the base and paver thickness.
Level the area, grading away from the home.
Compact the subgrade using a plate compactor for stability.
Step 3: Building the Base
Lay gravel and sand layers, compacting each layer thoroughly.
Include geotextile fabric to prevent soil movement.
Ensure base thickness suits the expected load (usually 4–6 inches for residential patios).
Step 4: Installing Edge Restraints
Secure steel or plastic edge restraints along the perimeter.
Check alignment and height relative to the house to avoid uneven edges.
Step 5: Laying the Pavers
Start at the house edge and work outward.
Maintain uniform joint spacing for a professional finish.
Cut pavers as necessary for edges and corners.
Step 6: Filling Joints and Compacting
Sweep polymeric sand or fine gravel into paver joints.
Compact the patio with a plate compactor, taking care not to damage pavers.
Refill joints as needed for full stability.
Step 7: Finishing Touches
Seal pavers to enhance color and protect against weathering.
Add steps or ramps for safe access.
Landscape edges with plants or borders for a polished look.
Raised vs. Ground-Level Paver Patios
| Feature | Raised Patio | Ground-Level Patio |
|---|---|---|
| Drainage | Excellent | Moderate, needs grading |
| Cost | Higher (base + structure) | Lower |
| Access | May need steps or ramp | Direct access |
| Foundation Impact | Minimal if properly built | Can affect soil settlement |
| Aesthetic Flexibility | High (multi-level designs) | Limited |
Frequently Asked Questions (FAQs)
1. How high should a raised patio be against the house?
Most raised patios range from 6 to 12 inches above grade. Ensure it aligns with door thresholds and allows proper drainage.
2. Can I install a raised patio on a sloped yard?
Yes, but slope adjustments and proper base preparation are critical for stability and drainage.
3. Do I need a permit for a raised paver patio?
Check local building codes. Patios above a certain height or near property lines may require permits.
4. How do I prevent water damage to my house foundation?
Slope the patio away from the house, install proper drainage, and consider a waterproof membrane along the house edge.
5. What paver materials last the longest for raised patios?
Concrete and natural stone are highly durable; porcelain is resistant to cracking and fading.
6. Can I DIY a raised paver patio, or should I hire a professional?
DIY is possible for smaller patios, but professionals ensure proper grading, drainage, and structural stability for long-term performance.
7. How much does a raised paver patio cost per square foot?
Costs vary: $15–$35 per square foot for materials and labor, depending on size, paver type, and base complexity.
8. How do I maintain a raised paver patio to prevent shifting or settling?
Regularly sweep and refill joints, inspect edge restraints, and reseal pavers every few years.
Conclusion
A raised paver patio against the house is more than just an outdoor feature it’s a functional, aesthetic upgrade that improves drainage, accessibility, and home value. Proper planning, high-quality materials, and careful installation are essential to ensure long-term durability. By following the steps outlined in this guide and considering factors like height, base preparation, and style, homeowners can create a safe, attractive, and lasting patio that complements their home perfectly.
For the best results, consult a professional installer, especially for multi-level or large patios, to ensure your investment is protected and your outdoor living space becomes a true extension of your home.