How to Lay Patio Stones
Creating a patio with stone is one of the most effective ways to upgrade an outdoor space. When done correctly, patio stones provide a durable, low-maintenance surface that looks professional and lasts for decades. This guide is designed to be the most complete, practical, and authoritative resource on how to lay patio stones, covering proven techniques used in successful patio paver installation, whether you’re a DIY beginner or planning a more advanced installation. Whether you’re planning a new pool or upgrading an outdated deck, this guide explains how concrete pool deck installation works, what it costs, which finishes perform best, and how to avoid the most expensive mistakes.
Short Answer: How to Lay Patio Stones the Right Way
To lay patio stones correctly, you must start with proper ground excavation, install a well-compacted crushed stone base, add a level sand bedding layer, and carefully place and align the stones before filling joints and compacting the surface. Skipping base preparation or leveling leads to sinking, weeds, and uneven stones over time.
What Does It Mean to Lay Patio Stones?
Laying patio stones means creating a stable, level outdoor surface by placing flat stone units over a prepared base system. The goal is both function and longevity.
Patio Stones vs Pavers vs Slabs
Patio stones: Large, flat units designed for outdoor surfaces
Pavers: Smaller, interlocking units often used for driveways
Slabs: Natural stone pieces, often irregular and heavier
Common Uses
Backyard patios
Garden seating areas
Walkways and pathways
Outdoor dining or fire pit zones
Why Proper Installation Matters for Patio Stones
Correct installation is the difference between a patio that lasts 3 years and one that lasts 30.
Structural stability: Prevents shifting and sinking
Drainage control: Avoids water pooling and frost damage
Weed prevention: Reduces maintenance
Longevity: Saves money on repairs
Safety: Eliminates uneven surfaces and tripping hazards
Tools and Materials Needed to Lay Patio Stones
Essential Tools
Shovel and rake
Carpenter’s level
Rubber mallet
Measuring tape and string line
Plate compactor (manual or mechanical)
Required Materials
Patio stones (concrete, natural stone, or porcelain)
Crushed stone or gravel base
Bedding sand (sharp sand or concrete sand)
Jointing or polymeric sand
Edge restraints
How to Lay Patio Stones: Step-by-Step Guide
Step 1: Planning and Measuring the Patio Area
Choose a layout pattern (grid, running bond, random)
Measure the total square footage
Plan a slope of ¼ inch per foot away from buildings for drainage
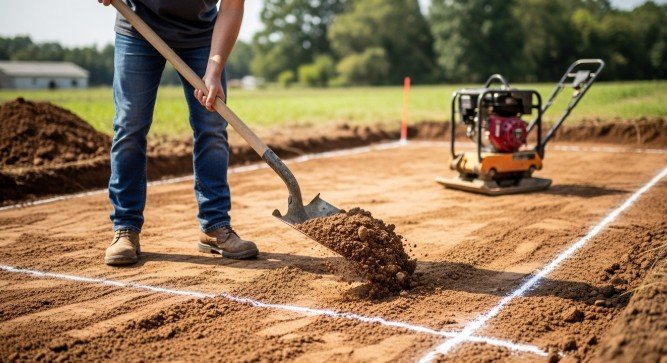
Step 2: Excavating the Ground Properly
Dig 6–8 inches deep for walkways
Dig 8–12 inches deep for patios in cold climates
Clay soil requires deeper excavation than sandy soil
Step 3: Creating a Solid Base Foundation
Add crushed stone in 2–3 inch layers
Compact each layer thoroughly
Typical base depth:
Walkways: 4–6 inches
Patios: 6–8 inches
This step determines whether your patio stones stay level long-term.
Step 4: Adding and Leveling the Sand Bed
Add 1 inch of bedding sand
Screed the surface using straight boards
Never compact the sand before laying stones
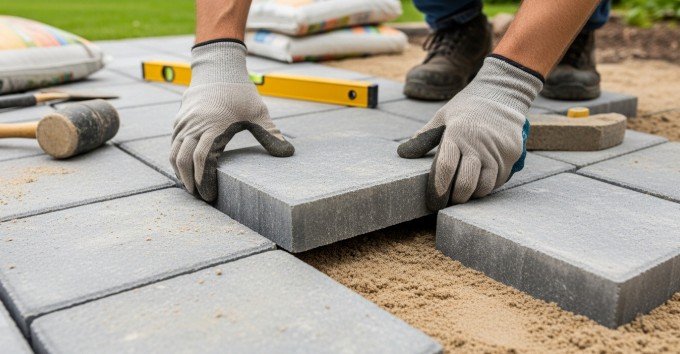
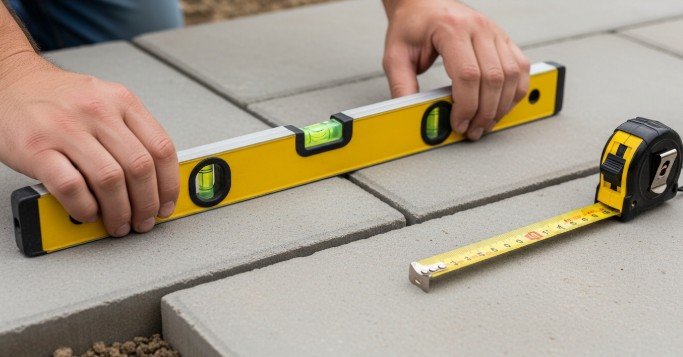
Step 5: How to Lay Patio Stones Evenly and Securely
Start from a straight edge or corner
Lay stones gently without sliding
Maintain consistent joint spacing
Check level every few stones
Patterns like running bond provide better load distribution than straight grids.
Step 6: Cutting Patio Stones for Edges
Use a masonry saw or angle grinder
Wear eye and dust protection
Cut stones to fit tightly along edges
Step 7: Securing Stones and Filling the Joints
Sweep jointing or polymeric sand into gaps
Compact the surface again
Refill joints as needed
Lightly mist polymeric sand to activate
Common Mistakes to Avoid When Laying Patio Stones
Skipping base compaction
Poor drainage slope
Using play sand instead of bedding sand
Forgetting edge restraints
Laying stones directly on soil
Different Methods of Laying Patio Stones
| Method | Base Type | Durability | Skill Level | Best For |
|---|---|---|---|---|
| Sand Set | Sand + gravel | Medium | Beginner | DIY patios |
| Mortar Set | Concrete base | High | Advanced | Permanent patios |
| Dry Lay | Gravel only | Low–Medium | Beginner | Temporary areas |
Patio Stone Types Comparison
| Type | Cost | Maintenance | Weather Resistance | Visual Appeal |
|---|---|---|---|---|
| Concrete | Low–Medium | Low | Good | Moderate |
| Natural Stone | High | Medium | Excellent | High |
| Porcelain | Medium–High | Very Low | Excellent | Modern |
How Long Does It Take to Lay Patio Stones?
Small patio (100 sq ft): 1–2 days DIY
Medium patio (300 sq ft): 2–4 days DIY
Professional installation: 1–2 days
Time increases with cutting complexity and base depth.
Cost Breakdown: How Much Does It Cost to Lay Patio Stones?
Materials: $4–$15 per sq ft
Tool rental: $50–$150
DIY total: $500–$2,000
Professional install: $15–$30 per sq ft
Maintenance Tips After You Lay Patio Stones
Sweep regularly
Re-sand joints every 1–2 years
Pressure wash gently
Protect joints before winter freeze cycles
FAQs: How to Lay Patio Stones
Can beginners learn how to lay patio stones themselves?
Yes, with proper preparation and patience.
How deep should the base be for patio stones?
Typically 6–8 inches, more in cold climates.
Do patio stones need mortar?
No. Sand-set installation is standard and flexible.
What is the best sand for laying patio stones?
Sharp sand or concrete sand, not play sand.
How do you prevent patio stones from sinking?
Proper base depth and thorough compaction.
Can patio stones be laid directly on soil?
No. This causes shifting and weed growth.
How do you ensure proper drainage?
Maintain a consistent slope away from structures.
How long do properly laid patio stones last?
25–30 years with minimal maintenance.
Conclusion: Best Practices for Laying Patio Stones Successfully
Learning how to lay patio stones correctly is about preparation, precision, and patience. A well-compacted base, proper drainage, and careful placement ensure long-term performance. DIY is ideal for straightforward patios, while complex designs may justify professional help. When done right, patio stones deliver lasting beauty, safety, and value to any outdoor space.