How to Install Interlocking Pavers
Installing interlocking pavers is one of the most reliable ways to create a durable, attractive, and long-lasting outdoor surface. Whether you’re planning a patio, driveway, walkway, or pool deck, understanding how to install interlocking pavers correctly is critical because most paver failures happen due to poor preparation, not the pavers themselves.
This guide is written from a professional, real-world installation perspective and is designed to be the most complete, practical answer on the internet for homeowners and property owners researching this topic.
Short Answer: How to Install Interlocking Pavers
Interlocking pavers are installed by excavating the area, building a compacted crushed-stone base, leveling a bedding sand layer, laying the pavers in a pattern, securing edges, and locking everything in place with joint sand and final compaction.
Typical requirements:
Time: 2–5 days (depending on size)
Skill level: Intermediate DIY
Tools: Plate compactor, level, screed rails, masonry saw
DIY vs Pro: DIY works for patios and walkways; driveways and heavy-load areas are best handled by professionals

Understanding Interlocking Pavers
What Are Interlocking Pavers?
Interlocking pavers are individual concrete, brick, or stone units designed to lock together through joint sand and edge restraints. Unlike poured concrete or asphalt, they flex slightly with ground movement instead of cracking.
How Interlocking Pavers Stay Locked in Place
Edge restraints prevent lateral movement
Compacted base layers distribute weight evenly
Joint sand (especially polymeric sand) hardens when activated, binding pavers together
Benefits of Interlocking Pavers
Exceptional durability under foot and vehicle traffic
Superior drainage, reducing puddles and frost damage
Easy repairs, since individual pavers can be replaced
Design flexibility, boosting curb appeal and property value
When Should You Install Interlocking Pavers?
Best Applications for Interlocking Pavers
Driveways: Strong load distribution
Patios: Design-focused outdoor living
Walkways: Slip-resistant and repairable
Pool decks: Cool underfoot and well-draining
Residential vs commercial: Thickness and base depth vary
Climate & Soil Considerations
Freeze–thaw climates: Require deeper bases
Clay soils: Demand enhanced drainage
Sandy soils: Easier to compact but still need structure
Tools, Materials, and Preparation Needed
Tools Required for Installing Interlocking Pavers
Plate compactor
Screed rails and straight edges
Level and rubber mallet
Masonry saw or paver splitter
Safety gloves, goggles, ear protection
Materials Checklist
Interlocking pavers
Crushed stone (granular base)
Bedding sand (concrete sand)
Edge restraints and spikes
Polymeric sand
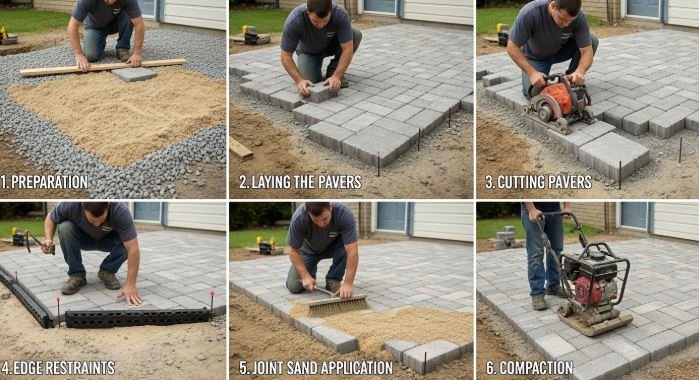
How to Install Interlocking Pavers: Step-by-Step Guide
Step 1: Planning, Layout, and Measurement
Measure total square footage and add 5–10% extra for cuts and waste. Choose patterns early—herringbone is best for driveways, while running bond works well for patios.
Step 2: Excavation and Ground Preparation
Excavate to the correct depth:
Patios & walkways: 8–10 inches
Driveways: 12–16 inches
Ensure a slope of ¼ inch per foot away from structures for drainage.
Step 3: Installing and Compacting the Base
Install crushed stone in 2–3 inch layers, compacting each layer thoroughly. This is the most important step—over 80% of paver failures come from poor base compaction.
Step 4: Bedding Sand Installation
Spread 1 inch of concrete sand and screed it perfectly level. Never compact bedding sand before laying pavers.
Step 5: Laying Interlocking Pavers
Start from a straight edge or corner and work outward. Place pavers tightly together without forcing them. Maintain consistent alignment.
Step 6: Cutting Pavers for Edges
Use a masonry saw for clean, accurate cuts. Tight edge cuts prevent long-term shifting.
Step 7: Installing Edge Restraints
Secure edge restraints along all exposed sides. Without proper restraints, pavers will spread and fail over time.
Step 8: Joint Sanding and Final Compaction
Spread polymeric sand, compact the surface, sweep in more sand, and activate with light water misting. This locks the entire system together.
Common Mistakes to Avoid When Installing Interlocking Pavers
Insufficient base depth
Poor drainage slope
Skipping edge restraints
Using the wrong type of sand
DIY vs Professional Installation Comparison
When DIY Installation Makes Sense
- Small patios or walkways
- Flat, well-drained areas
- Homeowners with access to proper tools
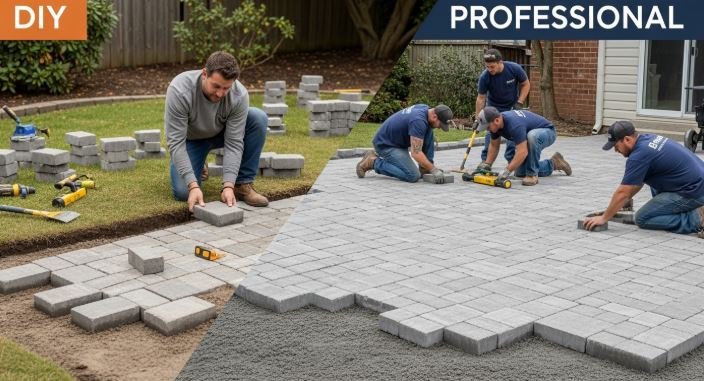

When Hiring a Professional Is the Better Option
Driveways and load-bearing areas
Sloped or drainage-sensitive sites
Long-term warranty expectations
DIY vs Professional Interlocking Paver Installation
| Factor | DIY Installation | Professional Installation |
|---|---|---|
| Cost | Lower upfront | Higher upfront |
| Time | Longer | Faster |
| Tools | Rented | Included |
| Durability | Skill-dependent | Industry-grade |
| Warranty | None | Often included |
Types of Interlocking Pavers Comparison
Concrete vs Brick vs Natural Stone Pavers
| Type | Durability | Cost | Best Use |
|---|---|---|---|
| Concrete Pavers | High | Medium | Driveways, patios |
| Brick Pavers | Medium | Medium | Walkways, patios |
| Natural Stone | Very High | High | Luxury projects |
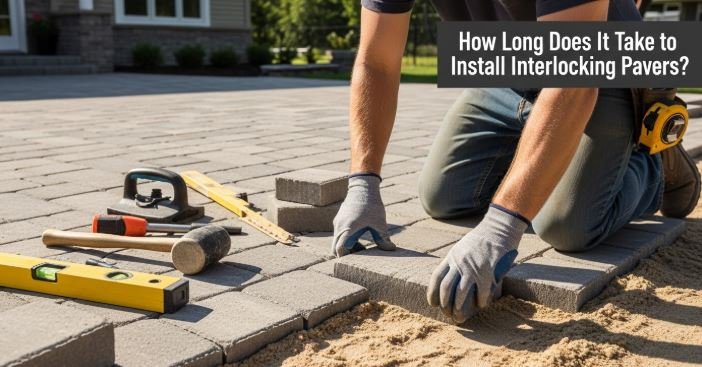
How Long Does It Take to Install Interlocking Pavers?
- Small patio: 2–3 days
- Large driveway: 4–7 days
Weather, crew size, and cutting complexity can affect timelines.
FAQs About How to Install Interlocking Pavers
How deep should the base be for interlocking pavers?
Typically 6–8 inches for patios and up to 12 inches or more for driveways.
Can interlocking pavers be installed over concrete?
Yes, but only if drainage and structural conditions are properly addressed.
How long do interlocking pavers last?
With proper installation, 25–40+ years.
Do interlocking pavers need sealing?
Sealing is optional but improves color retention and stain resistance.
What is the best sand for interlocking pavers?
Polymeric sand for joints and concrete sand for bedding.
Can interlocking pavers handle vehicle weight?
Yes, when installed with proper base depth and pattern.
How do you prevent weeds between pavers?
Use polymeric sand and maintain joints.
Is polymeric sand necessary?
Not mandatory, but highly recommended for durability and weed prevention.
Conclusion: Is Installing Interlocking Pavers Worth It?
When installed correctly, interlocking pavers offer unmatched durability, design flexibility, and long-term value and only Patio Paver Installation could make that happen. While DIY installation can work for smaller projects, professional installation ensures optimal performance especially for driveways and high-load areas.
If you’re looking for a surface that combines strength, beauty, and repairability, interlocking pavers are absolutely worth the investment.